Introduction: Transforming Your Garage into a Summer Workshop Haven
Imagine turning your garage into the ultimate summer workshop—a clean, durable, and visually stunning space where your hobbies and DIY projects thrive. A critical foundation for this transformation is choosing the right garage floor coating. Concrete floors, while common, are porous and prone to stains, wear, and damage over time, especially in a busy workshop.
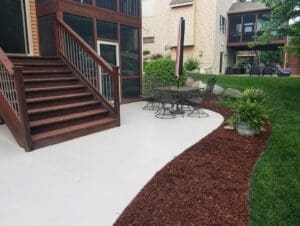
Applying a high-quality epoxy coating or other floor coatings not only protects your concrete but also creates a smooth, easy-to-clean surface that enhances your workspace.
With the right garage floor epoxy, such as well-regarded brands like Rust-Oleum EpoxyShield, you can achieve a professional-grade finish with options for color and high gloss shine that resist hot tire pickup and chemical spills. Whether you prefer a water-based epoxy floor or polyurea coatings, these products offer long-lasting protection and a great aesthetic for your garage flooring.
Plus, many come in convenient floor coating kits, making application easy for hobbyists and DIYers alike.
Before diving into your workshop projects, having a properly coated and maintained garage floor ensures a safer, cleaner, and more enjoyable environment all summer long. Your garage floor paint or coating is the essential first step in crafting a workspace you’ll look forward to using every day.
Choosing the Right Type of Garage Floor Coating
Epoxy Floor Coatings
Epoxy is a popular choice among hobbyists and DIYers for garage floor protection due to its affordability and chemical resistance, especially to car fluids, oil, and grease. This coating offers up to 10 years of durability when properly applied, making it a solid option for many garage settings. However, epoxy has some limitations — it tends to be more brittle and is susceptible to chipping, scratching, and peeling over time.
It can also become slippery when wet, and typically requires a longer curing time of up to 72 hours, which might be a consideration if you need your workspace up quickly.
Polyurea and Polyaspartic Coatings
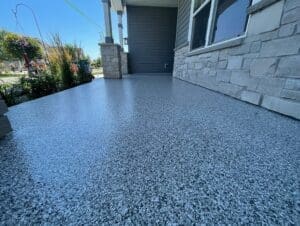
For those looking for premium durability and flexibility, polyurea coatings stand out. These coatings are more than four times stronger and almost 100% more flexible than epoxy, which means they better resist cracking and flaking.
Polyurea is highly resistant to abrasion, chemicals, UV rays, and extreme temperatures, maintaining its vibrant color and finish for years, especially in garages exposed to natural light. Additionally, polyurea cures in a fraction of the time epoxy takes—often within 24 hours—allowing faster project completion.
Being water and chemical resistant with low VOC emissions, polyurea also presents a safer and more sustainable garage floor coating option, ideal for a workshop environment.
Other Considerations
Beyond durability and appearance, other factors should guide your choice of garage floor coating. Consider the maintenance needs — epoxy floors are generally easy to maintain, but may lose their gloss over time. If you want a high-gloss finish that lasts, polyurea offers superior hold.
Also, think about your climate and garage use: if temperature fluctuation is substantial in your region, polyurea’s flexibility helps it adapt without damage. Finally, your skill level and time availability might influence whether you opt for a DIY-friendly floor coating kit or prefer professional installation, as proper surface preparation is essential for adhesion and longevity of any coating you choose.
Step-by-Step Guide to Applying Flooring Coatings
Preparing the Surface
Properly preparing your concrete floor is essential to ensure your garage floor coating adheres well and lasts for years. Start by thoroughly cleaning the floor — remove all dirt, dust, debris, grease, and oil stains using a good degreaser and a stiff broom.
For stubborn residues, apply a concrete etching solution to open pores in the concrete, which helps the epoxy or coating bond better.
After cleaning and etching, rinse the floor thoroughly with water and let it dry completely—this can take up to 24 hours depending on humidity. Remove baseboards and use painter’s tape along the walls to protect surfaces. Make sure the garage is well-ventilated, and check the floor for any moisture issues because coatings will fail if applied on damp concrete.
Application Process
Once your floor is prepped and dry, mix your epoxy floor coating or chosen product according to the manufacturer’s directions. Most kits include a resin and hardener, which must be combined right before application. Stir thoroughly but avoid introducing too many air bubbles.
Using a paintbrush, “cut in” the edges near walls, then apply the coating with a roller over the main floor area in manageable sections to maintain a wet edge.
If your coating kit includes decorative flakes or chips, sprinkle these over the wet epoxy after the first coat for texture and enhanced grip. Allow the first coat to dry fully before applying a second coat or a clear protective top coat, typically waiting at least 12 hours between layers. Most epoxy or polyurea coatings cure completely within 24 to 72 hours, so plan your project timeline accordingly.
Maintenance Tips
To keep your newly coated garage floor looking its best and performing well, routinely clean it with a mild detergent and soft mop or broom. Avoid harsh chemicals, abrasive cleansers, or high-pressure washing which could degrade the coating over time. Check periodically for any small chips or damage and touch them up promptly to prevent deterioration.
For long-term garage floor protection, consider applying a fresh top coat every few years. This helps maintain the shine, repairs minor surface wear, and ensures the coating remains resistant to hot tire pickup, oil stains, and heavy foot traffic, keeping your workshop space safe and great-looking season after season.
Incorporating Workshop Design Elements
Functional Layout Considerations
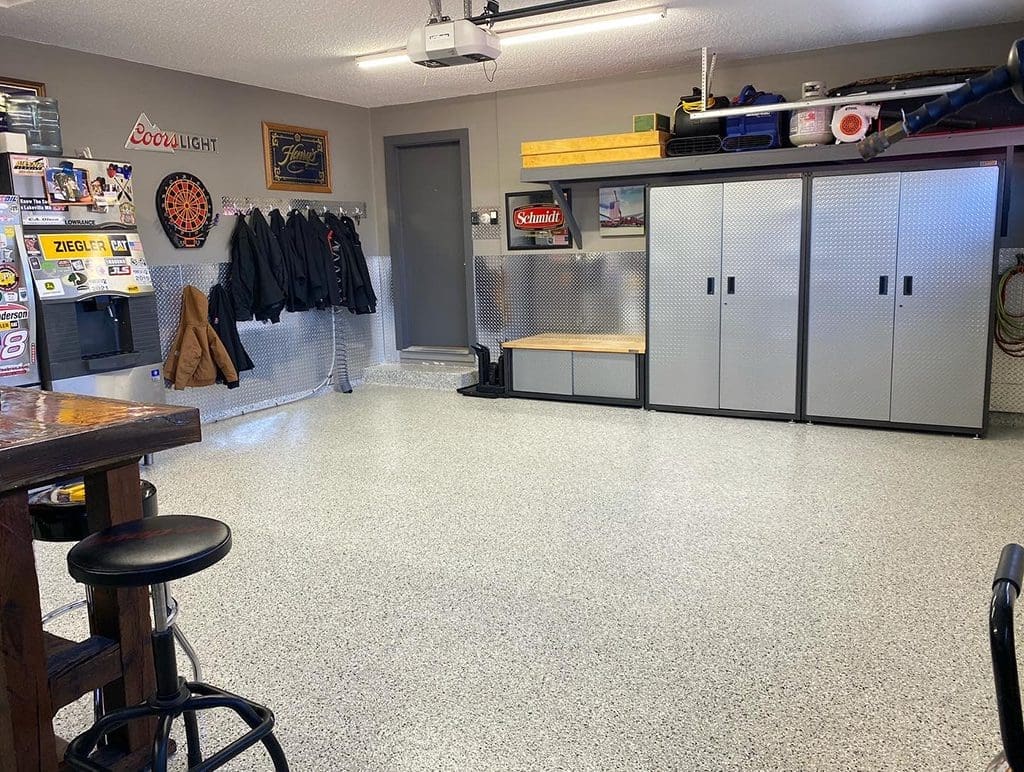
When designing your garage workshop, the layout is the skeleton that supports every project and tool. Consider the most effective way to maximize your space: a U-shaped arrangement is ideal for larger garages, offering ample storage and dedicated work zones for different tasks, while an L-shaped layout fits smaller spaces by making use of two walls and keeping traffic areas clear. If your garage is truly compact, a one-wall layout minimizes clutter, but you’ll need creative storage solutions to keep everything organized.
Alternatively, the island layout places a central workbench for easy 360-degree access, but requires enough floor space to move around comfortably .
Dividing your garage into designated zones—workshop, storage, even a home gym—enhances organization and prevents confusion. Use shelves, cabinets, or even simple floor tape to mark these areas, and consider mobile or fold-down workbenches for ultimate flexibility. For a hands-on approach, map your equipment with masking tape on the floor to visualize your workflow before finalizing any moves .
Lighting and Ventilation
Good lighting is essential for both safety and precision work. Overhead LED strips provide bright, even illumination without shadows, while task lighting at your workbench helps with detail-oriented projects. Make sure windows and doors allow for ample natural light when possible, and consider adding a ceiling fan or ventilation system to keep your workspace cool and comfortable through the summer months.
If your garage lacks natural airflow, a portable exhaust fan can help clear fumes from paint, chemicals, or epoxy coatings. Pair this with wall-mounted cabinets or shelves that don’t block airflow, and you’ll create an environment that’s as refreshing as it is productive.
Customization Ideas
Your garage workshop should feel personalized and inspiring. Start with a color scheme that energizes you—a crisp white or bold accent wall can make the space feel larger and more inviting. If you’ve used a high gloss floor coating, let the shine set the tone for a professional-grade look.
Get creative with storage: slatwall panels let you hang tools and accessories with easy access, while pegboards keep frequently used items visible and within reach. Rolling carts transform to suit any job, and overhead retractable pulley systems are a clever way to store seasonal gear.
For those with a penchant for cars, consider interlocking garage floor tiles in a designated area—these not only look great but also offer cushioning for long hours at your task.
Finally, remember that your workshop is a living space. Add a chalkboard or noticeboard for project sketches, a small fridge for refreshments, or even a corner for relaxing—after all, your summer workshop should be a place you’re proud to spend time in, reflecting both your hobbies and your unique style.
Conclusion: Enjoying Your New Summer Workshop
Creating your perfect summer workshop starts with the right garage floor coating, providing a clean, durable foundation that protects and beautifies your space. By choosing the appropriate flooring coatings like epoxy or polyurea, and carefully preparing and applying them, you enhance both function and longevity.
Incorporating smart layout, lighting, and personalized design elements elevates your workspace into a true hobbyist’s haven. Now it’s time to take action—transform your garage floors and enjoy a productive, inspiring summer workshop where your projects can truly shine.
FAQ
What are the essential steps to properly prepare a garage floor before applying epoxy coatings?
Essential steps to prepare a garage floor for epoxy: clear the space; scrape off debris, old paint, and caulk; thoroughly clean and degrease the concrete; rinse and let dry; etch the surface to ensure adhesion; fill cracks and joints; and finally, ensure the floor is completely clean and dry before applying epoxy .
How long does it typically take for different types of garage floor coatings, such as epoxy and polyurea, to fully cure before I can move my items back in?
Epoxy floor coatings typically take 12 to 24 hours to be walkable , but full cure usually requires 7 days before heavy items or vehicles can be moved back in. Polyurea coatings cure faster, often within 24 to 48 hours, allowing earlier use.
Environmental conditions affect exact times .
Can cracks in the garage floor be effectively repaired before coating, and will these cracks reappear after the coating is applied?
Cracks in a garage floor can be effectively repaired before applying a coating by filling them with specialized epoxy products designed for crack repair, such as low viscosity epoxy or Quick Patch, which bond well and cure with the coating . Proper surface preparation, including cleaning, drying, and possibly acid etching, is essential .
When correctly repaired and coated, cracks typically do not reappear, as the coating adheres firmly to a stable base, preventing crack expansion and maintaining floor durability .
What precautions should be taken to protect garage belongings and ensure a smooth coating application process during the workshop?
To protect garage belongings and ensure smooth coating application during a workshop, take these precautions: remove or cover items to avoid paint contamination, wear protective gear, ensure proper ventilation, use a clean air respirator, secure a well-ventilated, flame-free environment, and apply precise masking to protect non-painted areas .